• Home
  • Beauty
  • Fashion
  • Makeup
  • Review
  • About
  • Contact

DHAWANSHI

Hey there lovely people!

I recently went shopping and bought quite a lot of things. Some products, I’ve been dying to buy and some of them are just some random things I’d like to try out.


I just made this aesthetic video of all the products I bought, you can check that out and scroll further if you wish to see some details of the products that I bought.


Here’s the list of things I recently added to my vault.

1. NYKAA MATTE TO LAST LIQUID LIPSTICK - CHAI


I ordered this lipstick off nykaa.com . I had been dying to try one of their lipsticks since the longest time. Also I really wanted a brown lipstick for a while. I’m just glad I found this product at the right time. It has a very matte finish and doesn’t come off easily which is really great. I love that it is really small in size as it can fit anywhere, perfect for travelling.


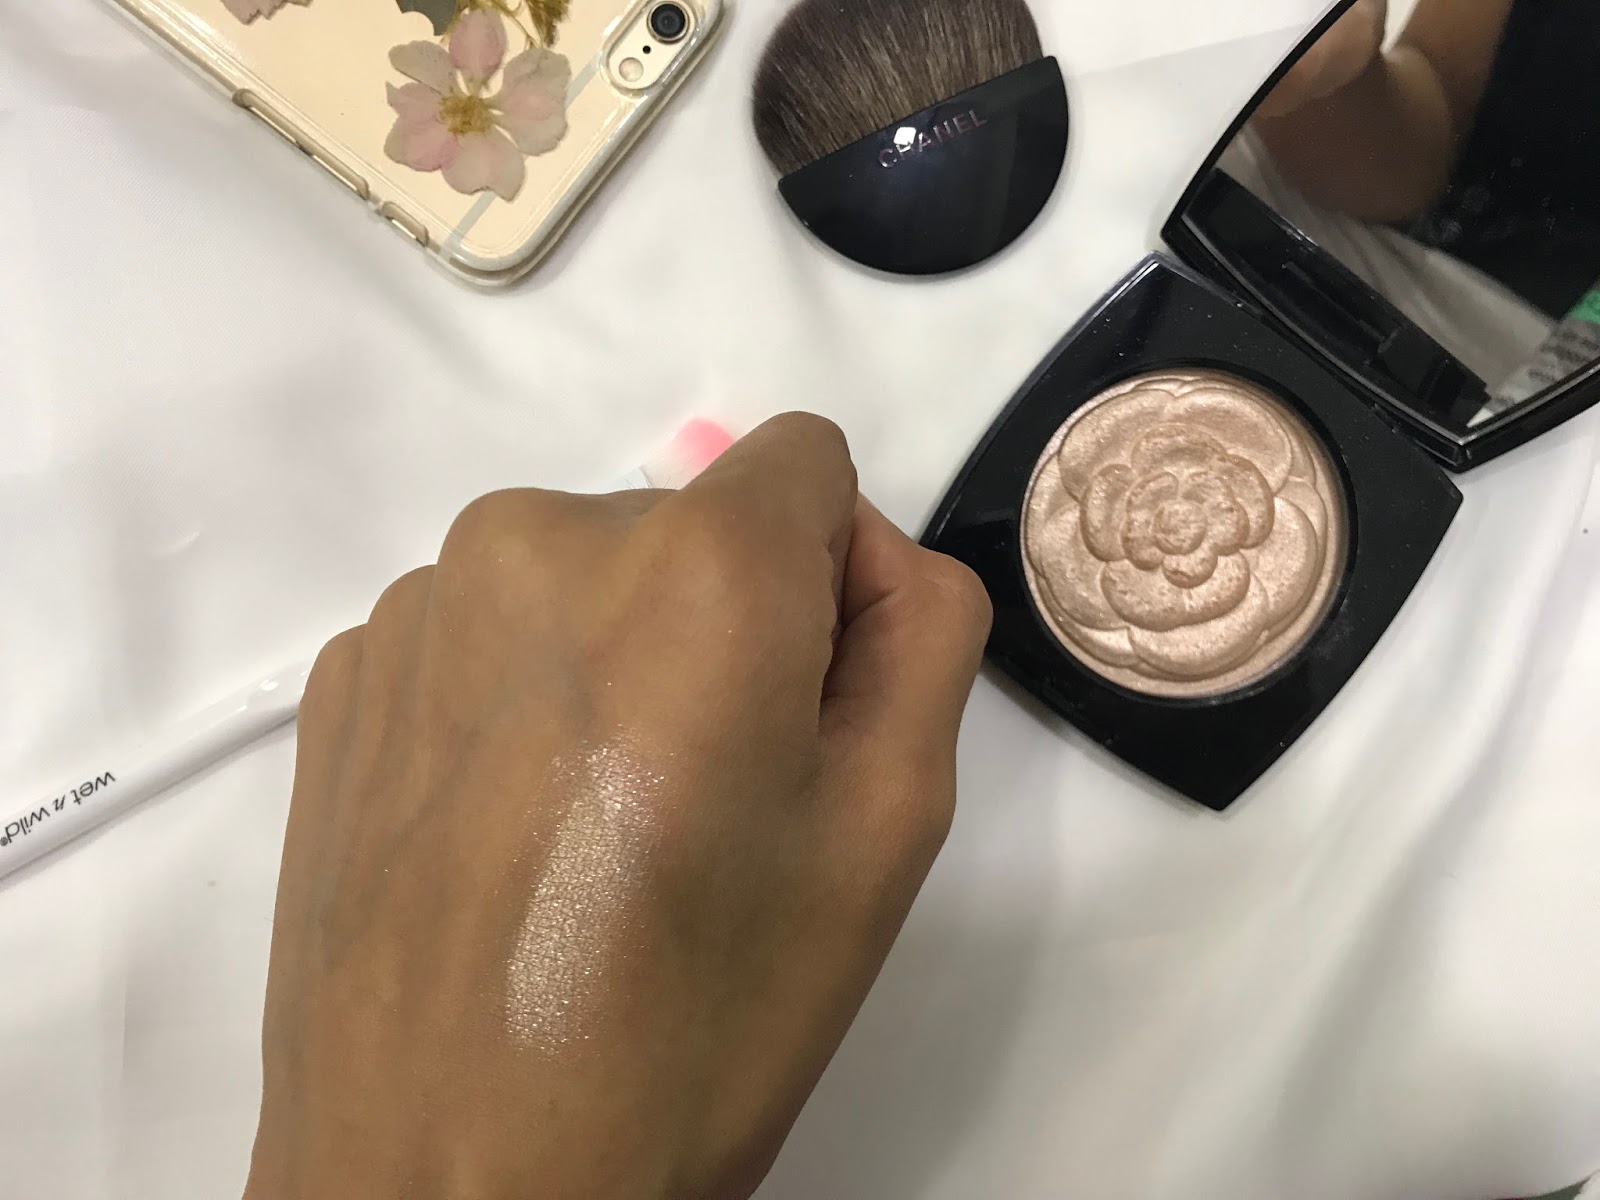
2. BENEFIT COSMETICS WATT’S UP HIGHLIGHTER


I’ve been looking for a cream highlighter for the longest time to be a part of my everyday makeup routine. This is because they are really subtle and easy to blend. You can use these without applying a foundation as they don’t need any kind of base to stick to unlike powder highlighters. This won’t be easily wiped away neither will it transfer on your hand with a single touch like most powder highlighters do, specially when applied without a base. The shade of this strobing cream matches with my tanned skin perfectly, I’m so excited to use this one out.


3. BECCA BEACH TINT - WATERMELON


This is one of those products which I bought just because I love the brand so much. But needless to say I am in love with this product, specially the way it smells. This is a lip/ cheek stain. Such kind of products give the most natural look and lately I’ve been enjoying such minimal effort looks. It is quite expensive for the size. But I can't wait to try this one out.


4. COVER FX CUSTOM ENHANCER DROPS - CANDLELIGHT


Somebody really has to stop me from hovering around any strobing products because the obsession is real. I mean this product looks so cool and is so versatile. Can’t wait to use it. This is basically a liquid highlighter that you can wear under your foundation, mix it in your foundation, wear it like you wear any other highlighter or can be used to illuminate your décolletage or just the whole body.


5. SEPHORA LIP GLOSS - SAND


I just wanted a clear lipgloss with some golden flex in it. From the swatches, I can see that it is pretty clear and also doesn't feel uncomfortably sticky like most glosses do. The great thing about this gloss is that I can wear it alone or with any lipstick shade from very nude to the boldest black if you have it in your collection.


6.  GIVENCHY NOIR INTERDIT MASCARA


I’ve been wanting to try some new mascara since a very long time because I keep shuffling between my Le Volume de Chanel and Benefit Roller lash. I had been eyeing this one since quite some time. Its just so cool, the wand sold me on this one. It is designed differently than other mascara wands which I am really curious to find out wether it would match my mascara requirements. Also as I opened it I find out that it smells like roses, this is definitely going to be one of those products which I keep with me even after I run out of it. 


7. CHANEL ROUGH ALLURE - ELEGANT


In the beginning I was quite hesitant to buy this lip shade. Chanel has very few dark shades present in the Maroon / brown range which I was hoping for to buy, and I was not really in the mood to buy another red or pink lipstick. Also I don’t usually go for any mauve shades but I bought this one just to get my self out go my comfort zone and also extend the number of looks I can do with the help of a purple-y shade lipstick. I love that its sheer and you can make it pigmented by layering it up according to your liking. This means that I can create the pigment that I want without wiping out most of my lipstick. So excited to try this one out and create looks using this lipstick.


8. CHANEL STYLO YEUX WATERPROOF EYE PENCIL - MAT TAUPE


I had been meaning to buy a brown eye pencil for ages. I love the softness that a brown eye pencil gives to your eye look. Its not too harsh, not too invisible but just right enough to make your look elegant. Also I love that this is a slightly darker shade of brown otherwise we all know the struggle of having even slightest bit of extra melanin. 


9. CHANEL HYDRA BEAUTY MICRO GEL CREME


I have the same level of excitement while buying skin care products as I have for makeup. Buying this was a jackpot. A while ago I had made some purchase at Chanel and I was given a sample of a creme from this range and I’ve been a fan of it then on. I had to buy it as it made my skin feel so soft, hydrated and just nourished. My skin lacks hydration and this product just does the work for me. Not to forget it has the best kind of cooling effect. I would definitely recommend this if you’re ever willing to spend that much. Also just shout out to the sales lady at Chanel she was so humble and gave me so many advices, it was great talking about makeup with her.


Share
Tweet
Pin
Share
1 comments

Hey guys!
It has been a hot minute since I've uploaded anything but I’m back with almost new everything. So I decided that I should really begin with the tools that I use to do my make up instead of just creating and posting my looks first. It’ll basically give an idea on why and how I use certain tools.

These are the face brushes that I use, the ones which I basically use to apply my base makeup.

Fluffy angled brush
I bought this brush about 6-7 years ago and I don’t remember where I bought it from neither does it have any name written on it. But you can find this kind of brush almost anywhere. I use this to apply my blush. The angle on the brush hit the right spot on my cheeks and the fluffiness of it really helps to blend the blush and make it look more natural. It is one of my ride or die brushes.

PAC Angle fluffy brush – 215
This is almost like the smaller version of the above fluffy brush. I use it to apply my highlighter as it hits right on to my highlighting areas and blends out the edges. I’m not a huge fan of the fan brushes used to apply highlighter as they just concentrate the powder to one particular area and I don’t like the final look of it. Although, this is not a necessary brush as you can even apply your highlighter with your fingers or even a beauty sponge too.

Forever 21 brush
I just totally made that name up. This brush doesn’t have any name and it comes with bunch of other brushes at Forever 21 that look so pretty. When I first bought the set I didn’t really expect all of the brushes to be so soft. This brush in particular I use the most to set my face with a powder. It is the perfect density and the tapered end perfectly fits under my eyes while I’m setting them. Also its big enough to quickly help me set my whole face with loose powder.

Fluffy Forever 21 brush
This one came in a set too which I bought long time ago. I like that it’s a little flat from the side and fluffy too which helps me apply my bronzer/contour and also seamlessly blend it out. The size is perfect to sit under my cheek bones and other small areas where I have to apply my bronzer. I don’t like using a lot of bronzer, I just use it to give some dimension to my face and not tan myself  like some beauty guru’s do with a big ass brush.

These are my eyeshadow brushes. My eye makeup has to look perfect out of everything and so I own quite a few. Each one has its own purpose.

Small pencil brush
This brush again I bought few years back and this one too has no name on it. This is a small brush with short bristles and is really good for applying eyeshadow under the eyes and highlight the inner corners of my eyes or the brow bone.

Pro Arte tapered shadow blending brush
I use this brush to apply shadow which I want to be diffused in a certain place. I usually use it after the transition shade, mainly to apply the eyeshadow below the transition shade. Sometimes I use it on the outer corner of my eyes to deepen and diffuse the outer corners.

Wet n Wild large eyeshadow brush
I use this brush to either apply the lid colour or when I don’t have and clean blending brush and I just want to blend out the overall edges of the eyeshadow. It is perfect to diffuse out the shadows in your under eye area too.

MAC – 217
What is a brush collection without this brush. This brush is almost like the above wet n wild brush but a bit more precise. I usually use it to apply the lid shadow and sometimes to deepen up my crease shadow a bit. But if you don’t want to invest in such an expensive brush you can always use the above wet n wild brush.

MAC – 224
This is one of my ride or die brushes too. I cannot live without this one. It is the best blending brush. It blends the shadow so seamlessly and is the best brush to apply the transition shade with.

Faces angled eyeshadow brush
I have this brush with me for so long. It is the best to get a proper diffused cat eye effect for the eyeshadow. The angle really helps give off a wing and the fluffiness blends the edges well.

theBalm dual ended brush
I like the fact that this is a dual ended brush. I wish they made more brushes like these so it would be easier for travelling. I use the fluffy side of the brush to deepen up the crease or the outer corner of my eyes and the flat end of the brush I either use under my eye or to apply a simmer eyeshadow to my lid.
These are my absolute ride or die eyeshadow brushes
Also guys I didn’t mention this earlier but I use the Real Techniques Miracle Complexion Sponge to apply my liquid foundation. This is the best sponge ever and gets bigger after wetting it. The best thing is that it doesn’t absorb too much of product that many other sponges do.

You can buy some good and affordable make up brushes from:

  • Nykaa's in house brushes
  • NYX cosmetics
  • Wet n wild
  • PAC cosmetics
  • L.A. Girl
I hope this post was helpful. You can comment down below in case you need help with buying good brushes.

Thank you!

Share
Tweet
Pin
Share
No comments
Hey guys!
So this is going to be one of my most favourite and also highly expected post. It’s all about glow and how you can look like you’ve swallowed the whole sun itself.

I am a highlighter fanatic and that explains why I have collected so many of these highlighters over the past few months, and there are a few in my bucket list. I love this trend as you can do so much with your overall makeup look by just choosing the intensity and the location of your highlight. Can we just take a moment of silence for this majestic product?
Here are the highlighters that I own and use for different kinds of looks and if I’m feeling extra I just wear all of them together and I have no shame in admitting that.

Wet n Wild megaglo highlighting powder in Precious Petals
This has to be the absolute favourite highlighter that I have. It has an amazing creamy, soft texture. The colour itself goes so well with my skin tone and it does not accentuate my pores at all. You can build it up and it will still not make you look oily. It’s just a glow gone right. You can apply just this and nothing else on your skin and you’re still good to go. I’m so thankful that this highlighter exists.

Camelia de Chanel
This of course had to make a feature on my post. It’s one of the first highlighters that I bought and with every use I get a little sad as this is a limited edition highlighter and I probably won’t ever find it again. Anyways this pearl coloured highlighter is best suited for a natural glow. You can build it up but it doesn’t have a blinding effect that most people love. The down point of this highlighter is that sometimes it leaves little chunks of glitter however it’s not exactly a glittery highlighter. The little fragments that go all over the place can easily be dusted of with a clean brush.

Smashbox Spotlight palette in Gold
To start off with I was a little disappointed with this highlighter palette as I thought all the three pans will show glows of different intensity. These are quite powdery however if you work with all the three together they’ll give you the best natural glow. The gold shades complement with my skin and the intensity is perfect for an everyday look. They are a little powdery, specifically the first shade - Turn it on. It has a little bit of a chalky feel but it provides a good base for the other two highlighters to work with.

Maybelline master strobing cream in Pink
This is the only liquid highlighter that I own (for now :P). The pink undertone of this strobing cream gives a healthy finish to your skin. I usually apply this under my foundation but you can even apply over it, alone or paired up with a powder highlight. Whatever works for you. As all liquid highlights have quite high intensity I like using it under my foundation. It goes well with foundations as it has a tacky feel after it dries off hence won’t let your foundation move around.

Here are the swatches of all the highlighters side by side.

So everyone has their own way of applying highlighter. Here’s how I glow for the day moreover some tips to help you REFLECT like a diamond.
  1. For people with texture on their skin this is for you. Usually people have pores on the medial side of their cheeks so make sure you want to apply your highlight as far away from it as possible. Wearing highlight on your pores or bumps will just make them more prominent.
  2. To make your nose look short, pointed and cute just apply the highlighter on the tip of your nose. And if you want to make your nose look a little bigger add that glowy shit to the bridge of your nose too. Create an exclamation point, missing a little part just above the tip of your nose as doing so will make your nose look pointed too.
  3. If you’re going for an everyday look and just want to wear highlight, you can spray some primer water, like the one from smashbox which I always use. Wait for it to dry just a little and then you can go on dusting that highlighter of yours.
  4. The last tip is to make any highlighter intense, spray some water or a primer water on the brush which you’re using to highlight with and then dip it in your highlighter and apply it. This method will make you look like the glowing goddess that you are and will also help your highlighter last longer.
Smashbox Photo Finish Primer Water
Also the brush that I use for my powder highlights is from P.A.C. cosmetics. It is a fluffy angled brush and hits right on the high points of my face. The size is decent enough to help me highlight my nose even.


So bada boom, bada bing! Here’s how you become the queen of glow land. Blind them folks with your shine. This was all about my highlight routine. I hope you find it helpful. Please leave a comment if you did find it helpful, would like to share your ideas or just some random suggestions about any future posts.
Share
Tweet
Pin
Share
No comments
Older Posts

Follow My Blog

Follow Me

Labels

Audrey Hepburn Everyday makeup Haul Highlighter MAC acne night routine chanel converse dior hair care nykaa sephora shein wet n wild

Popular Posts

  • How to Maintain Your Skin After Recovering From Acne
  • Very Real Morning Routine (no make up)
  • Aesthetic Makeup Haul
  • Duty Free Make Up and Beauty Haul

recent posts

Blog Archive

  • ▼  2019 (1)
    • ▼  March (1)
      • Very Real Morning Routine (no make up)
  • ►  2018 (18)
    • ►  November (1)
    • ►  September (2)
    • ►  July (1)
    • ►  June (1)
    • ►  May (2)
    • ►  April (2)
    • ►  March (2)
    • ►  February (2)
    • ►  January (5)
  • ►  2017 (7)
    • ►  June (2)
    • ►  May (2)
    • ►  April (1)
    • ►  March (2)
FOLLOW ME @DHAWANSHI

Created with by BeautyTemplates | Distributed by Gooyaabi Templates